
A guide to planetary interaction in EVE Online
1. Introduction
Eve online lets you interact with the various planets that appear in the game for the purpose of resource acquisition. Materials gained through planetary interaction (PI) are called planetary commodities. This guide will cover the practical aspects of acquiring them.
1.1 Overview
2. The very basics
2.1 Planets
To view a planet in your solar system, select it, look to your selected item window and click View
in Planet Mode.
To view a planet from your map, open the star map, find the system you want, go to show info,
open the Orbital Bodies tab, find the planet you want to look at, right click it and click View in
Planet Mode.
There are Different types of planets. Each type of planet has 5 commodities on it, in varying amounts. The various planet types can also have other relevant attributes like the radius, which affects the prices of planetary links.
Resources are not uniformly distributed over the planetary surface. To find out which resources are
plentiful where, you must scan. The remote sensing skill lets you scan planets.
Image 2.1.1. displays an example of scanning a planet. The scan button is right next to the build
button, in the upper left corner. You must select the commodity you wish to scan for.
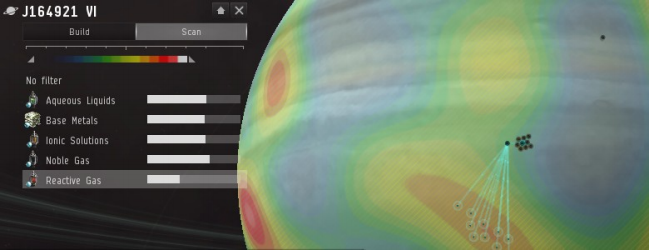
2.1.1 scanning a planet
The concentration of the various commodities on your planet are color-coded, with blue and green being poor and red and white being rich. Adjust the slider to take a better look.
2.2 Commodities
The purpose of planetary interaction is the acquisition of planetary commodities. Planets both mine
and refine planetary commodities (but planets have nothing to do with blueprints). Before you set
up your first planet, you must decide on what commodity you want to produce.
Third party websites like the ones listed below can help you make that decision.
http://games.chruker.dk/eve_online/
Once you’ve made a list of the planets available to you, you can use the eveplanets website to figure
out what you can make with the planets in your immediate area.
Image 2.2.1. displays the commodities you can build on a set of barren, gas and storm planets.
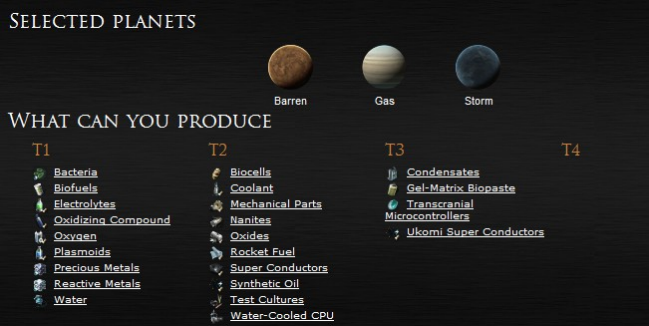
2.2.1 using eveplanets to look at commodities available for construction
There are 5 tiers of planetary commodities, starting with 0 and ending with 4. Tier 0 is mined directly, while all other are made via processors.
2.3 Planetary facilities
The first planetary facility that you must build on a planet is a command center. This building
provides your planet with the two planetary construction resources – CPU and power grid. Note the
similarity between building a planet and fitting a ship.
Also note that each planet has a corresponding command center – Barren command center, Gas
command center and so on.
To build a command center on a planet, you must buy it from the market, put it into your cargo hold
and be undocked in the system with the planet on which you want to build.
A command center also has 500m3 of space and is able to launch its contents. Never do this. Never
store anything in your command center. Never link your command center to anything.
The Launch pad allows you to move things between your planet and a planetary customs office. It
also has 10000m3 of space. This building makes both the command center and storage facilities
pointless to use.
To use the launch pad’s orbital transfer ability, you must be undocked in the same solar system.
Each transfer also costs you a certain amount of ISK, which is determined by the owner of the
customs office. When you use our own customs office, this is free, so try to stick to that.
Also, never use a highsec customs office, they charge an additional NPC tax.
Extractor control units are the facilities that you spawn extractors (extractor heads) from. From it,
you can create up to 10 extractor heads, which do the actual mining and provide you with the base
resources that all planetary commodities are made of. Extractor control units do not actually do any
work themselves.
They have limited range and are cheap, so you can reposition them whenever the resources your are
mining run out. Do not build multiple extractor control units, as they take up the resources you need
to build the facilities that make actual money.
Processors come in 3 tiers and they all perform the same basic function – turning lower-tier
commodities into higher-tier commodities.
Basic turn 0 into 1, advanced turn 1 into 2 and 2 into 3 and high-tech turn 3 (and 1, in some cases)
into 4.
Storage facilities give you more space. The only reason to build this is if you don’t want to go to
the solar system where your planet is in order to transfer from your launch pad to the customs
office. You can instead keep it in the storage facilities for a while.
Planetary links allow for the transfer of commodities between facilities. The longer they are, the
more power grid they consume.
2.4. Interplanetary transportation
Moving planetary commodities between customs offices and stations cannot be automated. You must use a hauling ship. The specialized hauling ship for this purpose is the epithal, which requires the gallente industrial skill. Technically speaking, using it is not mandatory. Practically speaking, it is mandatory unless you want to drive around in an untanked iteron (you don’t).
3. Setting planets up
Once you have decided on what to build and bought a command center (or several), you can start
building.
Put your command center into your cargo hold and be undocked in the system in which you want to
set up your command center.
Once those conditions are met, open the planetary view, go to build, find Command Center and
place it on the planetary surface, then click submit. You may only have one command center per
planet per character.
The location of a command center isn’t actually all that important to your profits. It does not take
part in the extraction and manufacturing process. Note, however, that your camera zooms in on the
command center by default, so you will have to scroll around to find your manufacturing center if
it’s too far from your command center, which is annoying in an already annoying part of the game.
You have been warned.
Now your command center must be upgraded. Click the command center, click upgrade in the menu
and upgrade it as much as you can. Your ability to upgrade a command center depends on your
Command Center Upgrades skill.
Image 3.1 displays an upgraded command center.
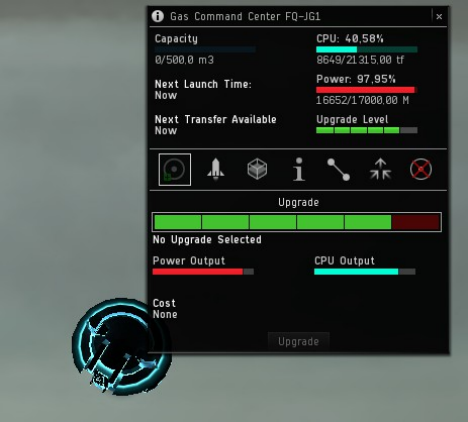
3.1. upgraded command center
There are two basic purposes to a planet – mining worlds and factory worlds. A mining world
extracts T0, turns it into T1 and exports it.
A factory world doesn’t extract anything, it just imports low-tier materials and exports high-tier
materials.
People new to planetary interaction and people with less than 8 or so planets should not build factory worlds. It will either end up sitting still most of the time or your will have to import a lot to keep it running.
3.1 Mining worlds
Now that you have power grid and CPU to build with, you should scan for a good location. Scan for
your desired T0 commodity and observe it for patterns. Some are pretty much random, other form
up in belts around the planet. Once you’ve determined a good area, place your launch pad.
Remember – everything goes into the launch pad, everything comes out of the launch pad. This is
your center.
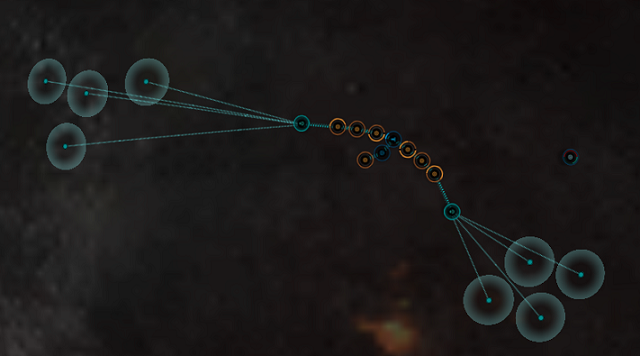
Next, place your extractor head. It has limited range, but it’s cheap, you can reposition it whenever you want. Place it so that your resource deposits (or just one of them) are in range of it, as displayed in image 3.1.1.

3.1.1. extractor control unit range and positioning
Keep in mind that you must also link it to your launch pad and longer links cost more power grid. The smaller the radius of the planet, the more of its surface your can reach without making prohibitively expensive links.
Now ctrl+click the extractor and click the launch pad. This will create a link which can then be used to transfer T0 commodities to your launch pad. Don’t forget to submit.
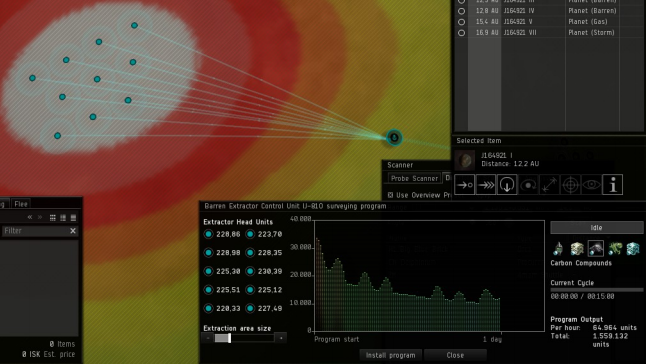
Now, you must place extractor heads. Click the control unit, click survey for deposits and you will
get the survey screen. On the right side of it, select your desired commodity. Set the extraction area
size on the left side of the screen to 1 day (or however much you want, 1 day is standard).
Now bring all extractor heads online by clicking them.
Image 3.1.2. displays the survey screen with the commodity selected, extraction area chosen and
some heads active.
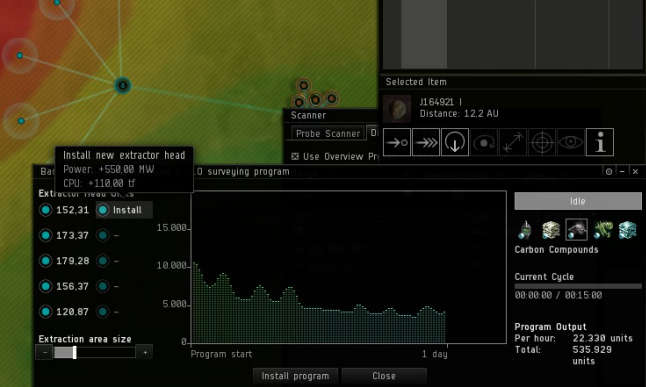
3.1.2. planetary survey window
Now you need to position the heads. Click and drag each individual head onto a concentration of
material as displayed in image 3.1.3.
Do not let them overlap, as this reduces their yield.
3.1.3. extractor heads on a resource deposit
Click Install program and submit.
Your extractor is now operational. The T0 product it’s making must now be routed. To create a route, click the extractor control unit, click products, select your product, click create route, click the launch pad and click create route again. Note that each link has a limited amount of capacity. Unupgraded links have a capacity of 1250m3/hour. You can see how close you are to capping out your link. It’s written in small gray letters under the link, as displayed in image 3.1.4.
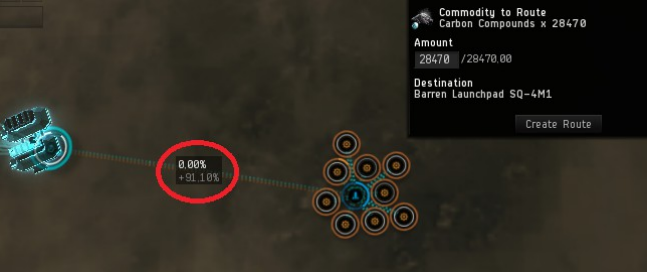
3.1.4. link capacity
Your T0 products are now routed to your launch pad. Now, you must build processors.
To figure out how many processors you need, go to your launch pad and go to routes. The route you
just set up should be visible and it displays your hourly input. Each basic processor can process
3000 units of T0 into 20 units of T1 per hour. So, divide your T0 input by 3000 and this is how
many your need.
Build basic processors in a circle around your command center. Then link each individual one with the launch pad (and only the launch pad). Now, go to each individual processor and set up the manufacturing job corresponding to your extracted T0 commodity, route the product to the launch pad and submit.
Now, you must route the T0 product into each individual processor. You can create routes directly
from storage, if you have anything in it, or you can create outgoing routes from an incoming route.
To do this, go to the launch pad, click routes, find your incoming T0 route, click it, click create
route and then route it to the processor you want to it go to (all of them, one by one).
The entire process involves a lot of clicking, but it only needs to be done once. From then on, this
will all work automatically.
Once you’ve routed your T0 to the launch pad, then to the processors and then to the launch pad, your planetary setup will automatically generate T1 commodities, as long as you keep the extractors running.
The most efficient setup I know of is to have 1 launch pad, 1 control unit and an adequate number of processors around your launch pad.
3.2. Factory worlds
A dedicated factory world has no extractors on it. It only turns imported commodities into higher tier commodities. The primary benefit of this is compression for transportation. T3 commodities cost more and take up less space than the T1 commodities used to make them. The example covered here turns 6 different T1 into 1 T3.
The part where you actually build the factory world is trivially simple, if annoying. First plop down
processors around the launch pad, link them and then route everything where it needs to go.
The important part is the planning, which isn’t all that complex either. A spreadsheet is highly
recommended, as it automates your thinking for you.
Skip this part if you don’t want to think:
Each T3 processor turns 3 types of T2 into 1 type of T3, consuming 10 units of each T2 and making
3 units of T3.
Each T2 processor makes 1 type of T2 out of 2 types of T1, consuming 40 units of T1 and making 5
units of T2.
Each cycle takes 1 hour.
This means that 1 T3 processor consumes 2 cycles of of each T2 and each T2 consumes 40
T1/hour.
So, for every cycle of T3, you must build 7 advanced processors which will consume 3240= 240
units of T1 per hour.
This means that you build your advanced processors in groups of 7, for T3 production. Just place them around the launch pad, link them all to the launch pad and then make the routes.
Image 3.2.1 displays a factory world setup. It’s currently inactive because that fucker from Sunspot hasn’t been online and he has to drop the tax on my alt so I can start importing water from him to my main again.
3.2.1. a factory world setup
3.3 P2 production worlds
The setups above are excellent if you are willing to dedicate time to your planetary setup. Having planets produce P2 items straight up is a less profitable way to use your planets, but it’s also a much effort intensive way to go about it.
Since you are splitting your power grid between exctraction and manufacturing, you need high yield planets for this to work well. This is perfect for wormholes.
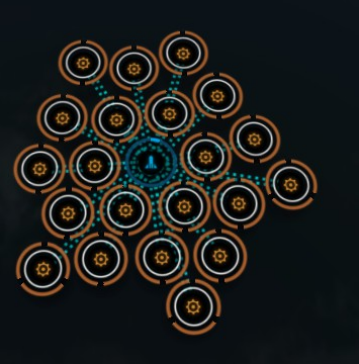
The setup involves 2 extractor control units, 4 basic industry facilities and 2 advanced industry facilities. Adding a storage unit or 2 is also common, as it gives you more time before you have to go pick up your materials.
Image 3.3.1 displays one such setup. The launch pad is in the middle and you position it between the two resources you require to create your desired P2 item. In this particular case, the setup on the image is making construction blocks. One extractor control unit is in charge of each required resource, with 4 heads each. The number of heads you use depends on your command center upgrades skill. The extracted P0s are then routed to the launch pad (or storage unit) and then to the basic industry facility. These products are further routed to the launch pad and then to the advanced industry factlity which routes the final P2 product back into the launch pad. These items are ready for pickup.
3.3.1. P2 production planet
4. Final notes on optimization
4.1 T2+ production on mining worlds (hybrid worlds)
This somewhat bulky name denotes a very simple concept – use up any spare power grid to build advanced processors.
When mining on low-yield planets, which will happen in lowsec, you will end up having some spare power grid. You will find all 10 of your extractor heads up and enough basic processors to refine all the T0 product, but you won’t need all that many processors. Still, you won’t have enough to build another control unit because those use up a lot of power grid. So, use your spare resources to build advanced processors. Then import some T1 product and combine it with the T1 product you are already producing.
4.2 Linking processors to each other
In earlier chapters, I instructed you to link everything on your factory world to your launch pad.
This is not actually the most efficient option.
You should be building your processors in rings around the launch pad. The innermost ring of 6
processors has the shortest links possible, but the next ring has links that pass through your inner
ring.
This is a very basic way to go about it – each processor is linked through the launch pad and each
route passes through the corresponding link.
Your processors do not need to be directly linked to the launch pad for a route to be formed. They
can use the links of other facilities as well.
This means that you can connect your first ring to the launch pad, then connect extractors in the
second ring to the closest extractor in the first ring and the extractors in the third ring to the closest
extractor in the second ring.
This will save your some link distance and might just be enough to squeeze in another processor on
your factory world.
Using this on a mining world, however, is potentially a bad idea because you use several things on
the same link which makes it much easier to overload.
Credit goes to Arbor Felix for pointing this out to me.